
Introduction
In this tutorial, I will be showcasing the usage of Gorilla Mux in different packages within a Go project. Gorilla Mux is an essential package for building robust web servers and HTTP APIs and is widely used in modern Go web development. I will demonstrate how to implement Gorilla Mux in different packages through the construction of an API, accompanied by detailed explanations of the code.
Before moving forward, it’s highly recommended to review the prerequisites and ensure that you have a solid understanding of them. This will ensure that you fully grasp the concept presented in this tutorial.
Prerequisites
To effectively utilize Gorilla Mux in different packages within your Go project, a basic understanding of the following concepts is essential:
- Go programming language
- HTTP protocol
- Web development concepts such as routing, middleware, and handling different HTTP methods
- Go web server development
If you are new to golang web development services, It’s recommended to have Go installed on your development machine and to set up your Go development environment before using Gorilla Mux. A text editor or integrated development environment (IDE) such as Visual Studio Code or GoLand is also helpful for writing and editing your code. In this tutorial, we will be using Visual Studio Code.
Before diving into the tutorial, it is important to have a solid grasp of the above-mentioned concepts and tools to fully understand and follow along with the implementation of Gorilla Mux in different packages. Now that you have the prerequisites, we can proceed with setting up our project environment.
Also Read: 3 REST API Design Problems And Possible Solutions
Setting Up the Environment
To demonstrate the building of a POST API, my main focus in this section will be showing how to set up a project directory and add dependencies. To begin, open the command prompt and use the following commands to set up your directory:
- cd Desktop – This will navigate you to the desktop directory
- mkdir Gin-Mux – This will create the directory for your project
- cd Gin-Mux – This will navigate you to the Gin-Mux directory
- go mod init github.com/golangcompany/Gin-Mux – This will create a mod file
- go get github.com/gorilla/mux – This will import the Gorilla Mux package
- go get go.mongodb.org/mongo-driver/mongo – This will import the MongoDB package
- code . – This will open your code editor in the project directory, allowing you to begin coding.
Now that you have the project directory and dependencies set up, you can proceed with the implementation of the API.
Creating the Entry Point
 [Image 1]
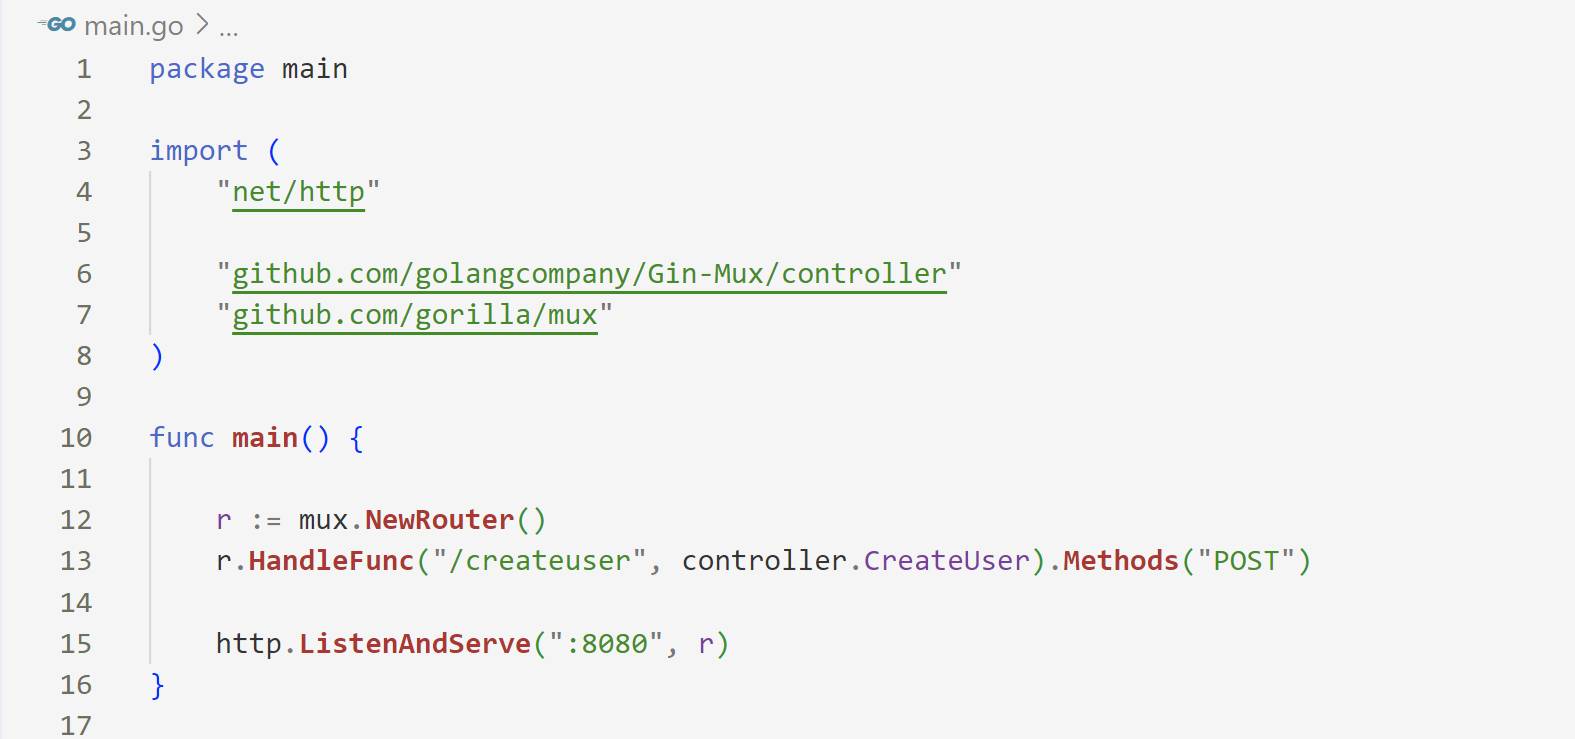
This code is responsible for configuring an HTTP server using the Gorilla Mux package and routing incoming requests to various handler functions. The necessary packages such as “net/http” and “github.com/gorilla/mux” are imported at the top of the code, with the “github.com/golangcompany/Gin-Mux/controller” package used to reference the handler functions. The main function of the program is where the execution begins.
A new router is created using the “mux.NewRouter” function and HTTP requests will be handled by this router. The next lines of code use the “r.HandleFunc” function to route requests based on the URL and HTTP method, associating different URLs and methods to specific handler functions from the imported controller package. In this example, requests with the POST method to URL “/createuser” will be routed to the “controller.CreateUser” function.
The last line starts an HTTP server on port 8080, where requests to the server will be handled by the router, routed to the correct handler functions, and processed. The next step in the project will be creating the data models and database for the project.
Database & Models
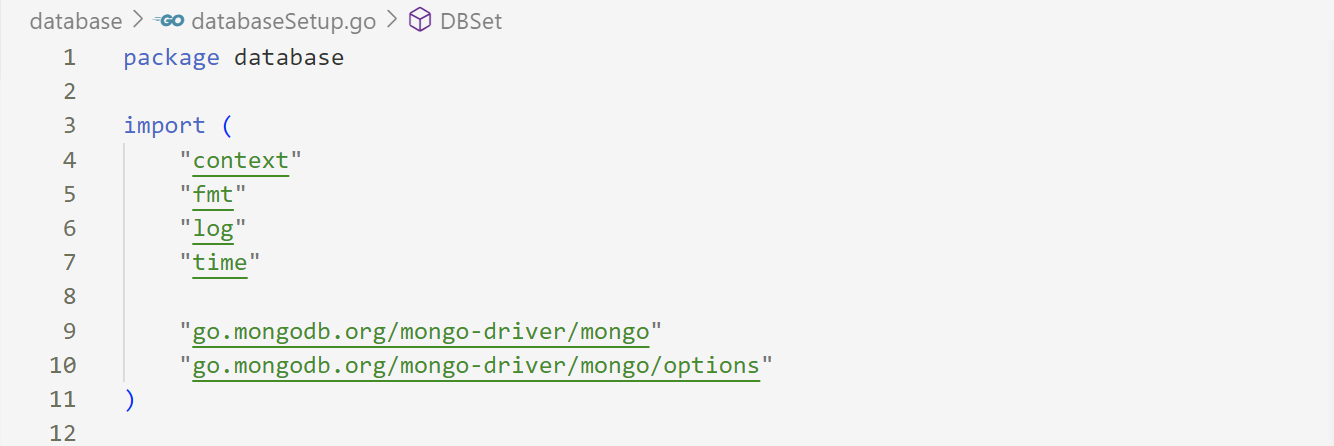
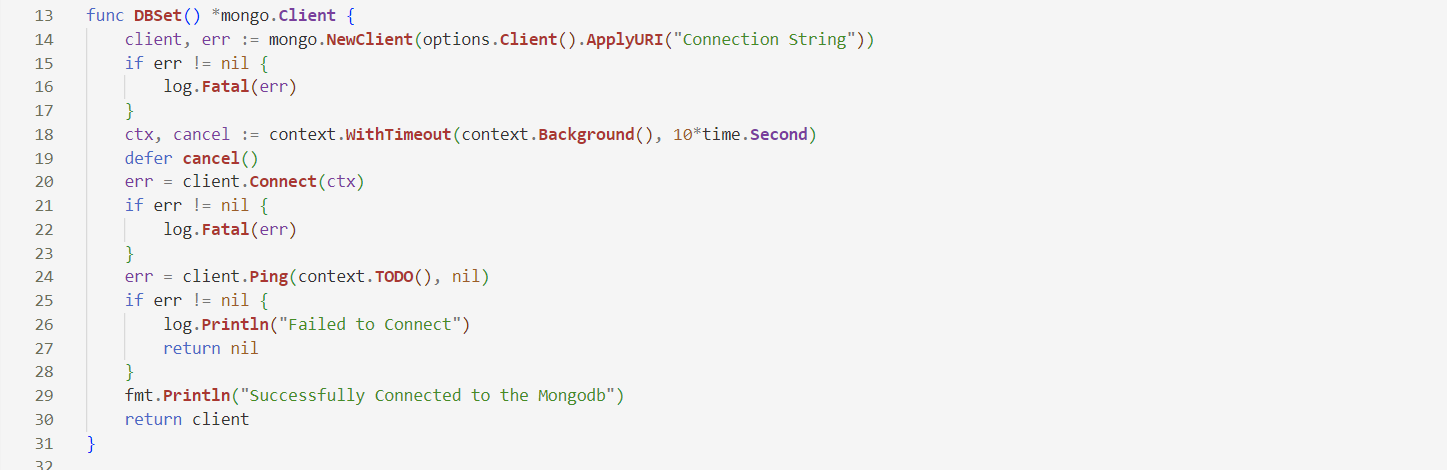
More details on database configuration may be found on my other blog, How to Connect the Golang Application with MongoDB. As a point of reference, I mentioned the code’s snap. Check out Images 2, 3, and 4 below.
 [Image 2]
 [Image 3]
 [Image 4]
 [Image 5]
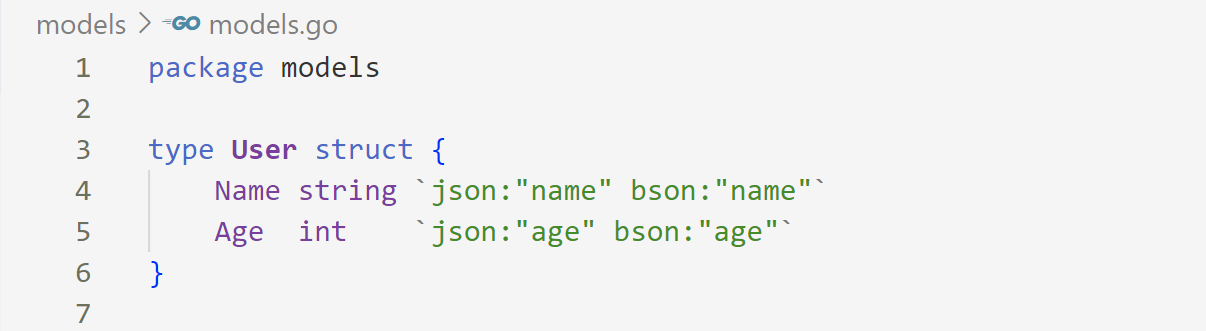
It’s always a good idea to start with a clear structure when building a program, and using a struct is a simple way to do that. In this case, the struct will be placed in the models directory. A struct is a custom data type that groups together related pieces of information. In this project, my struct contains two fields: Name and Age. You can see the code for this in Image 5. Here, In this project, the struct has two fields: Name and Age. The user’s name is contained in the field “Name,” a string that is marked with the tags “json:”name” and “bson:”name” to indicate that it should be serialized as “name” when the struct is converted between the JSON and BSON formats. The user’s age is stored in the field “Age,” which is an int. Additionally, it is marked with the tags json:”age” and bson:”age,” indicating that it should be serialized as “age” in the resulting JSON and BSON forms.
Creating the controller
 [Image 6]
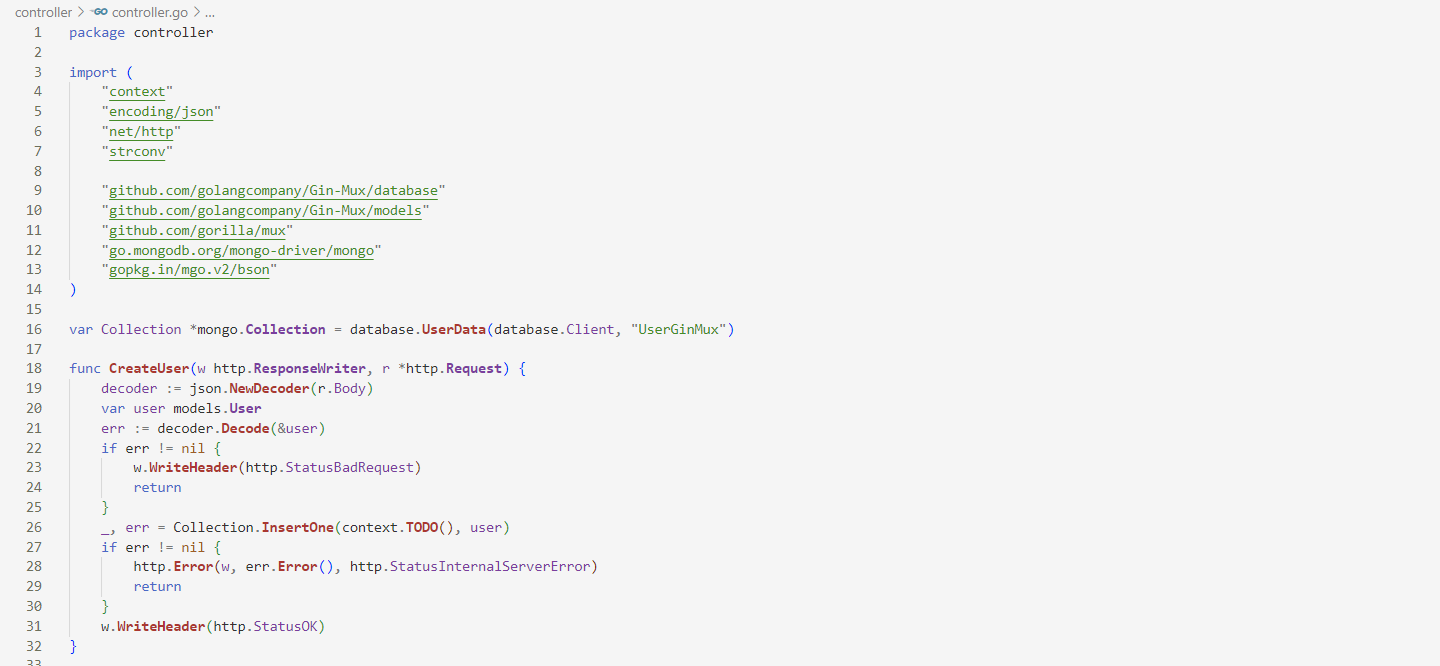
In this section, I will guide you on how to write the code for the controller file. First, you need to import several packages as previously mentioned. Next, you will declare a variable named “Collection” of type “*mongo.Collection.” The output of using the function “database.UserData,” which takes in a “database.Client” variable and a string representing the collection’s name, is assigned to the “Collection” variable.
This helper function retrieves a collection from the database using the provided client and collection name. The “database.Client” variable serves as a client for a MongoDB database. By using the “Collection” variable, you can access the specified collection in the MongoDB database throughout the rest of the code and perform actions such as adding, modifying or deleting documents.
I also defined a function called “CreateUser” that handles HTTP POST requests. It has two parameters: “w,” an “http.ResponseWriter” interface used to write the HTTP response, and “r,” an “*http.Request” pointer representing the HTTP request. The function uses the “json.NewDecoder” function and the request body to create a new json.Decoder then declares a variable “user” of type “models.User” to store the decoded user data.
The function calls the “Decode” method on the decoder to decode the request body into the “user” variable. If an error occurs during this process, the function writes a “400 Bad Request” HTTP status code to the response and returns it. Otherwise, it calls the “InsertOne” method on the “Collection” variable to insert a new document into the collection.
If an error occurs while inserting the document, the function writes a “500 Internal Server Error” HTTP status code and the error message to the response and returns. If there are no errors, the function writes a “200 OK” HTTP status code to the response.
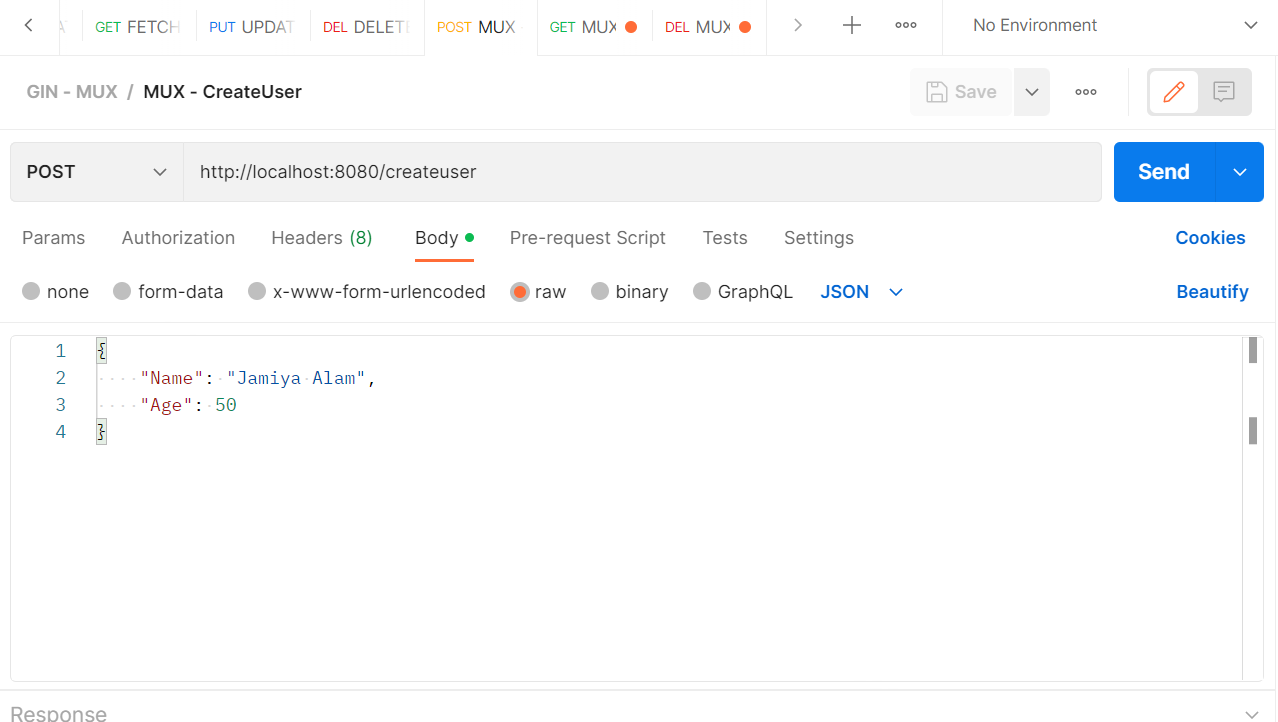
I have included the images of the Postman Application, which I used to test the API, and a snapshot of the collections in MongoDB Atlas for your reference. You can find these images as Image 7 and Image 8. I hope this blog post was helpful for your learning.
 [Image 7]
 [Image 8]
We, at New Techno Times aim to provide the best technology information to readers to gain knowledge of what is going on in the world around us. For related blogs about cybersecurity and technology, Digital Marketing, Business, Education keep following us.