
Salesforce has a huge ecosystem. Staying updated on its latest tools and features might be difficult for the developers. Our topic of discussion here is integrating Java apps with Salesforce using web services.
Sun Microsystems built and launched Java in 1995. Since then, we have witnessed the advent of various web programming languages, Web 2.0, containers, cloud-native architectures and microservices. Since the initial launch of the language, businesses have leveraged high-quality Java development services to build robust applications with futuristic features and the same will continue to happen in the future.
On the other hand, we have Salesforce, a popular CRM software. Businesses, especially large enterprises nowadays, have to use or rely on multiple applications preferably with cloud setups. Moreover, these applications must be integrated using Java best practices to provide a seamless user experience and increase the efficiency of business operations.
Therefore, we need to integrate the Java applications with Salesforce. Here, we will discuss how seamless integration should be done between Java and Salesforce apps and how to establish communication channels between both platforms.
We will take an example of a business application to show how developers can set up the environment and then connect the pieces.
Salesforce and the API-first Approach
Did you know that Salesforce was one of the pioneers who developed and deployed web APIs? While creating any feature on the platform, Salesforce always takes the API-first approach.
Although the Salesforce platform itself comes with a lot of built-in tools and features, it also enables its users to build their custom tools and features on the platform to fulfil their unique requirements.
The reason behind providing APIs to customers is to allow them to customize the Salesforce.com or SFDC and connect it with external apps via web services. Some of the widely used APIs from Salesforce are”
- REST API
- Chatter REST API
- SOAP API
- Tooling API
- Metadata API
- Streaming API
It is safe to say that Salesforce has filled its platform with APIs which provides a lot of potential for countless use cases. And now it’s time to discuss our use case.
Let’s take an example of a Java app that helps businesses with lead generation. The sales department would be using Salesforce. So, they would want to receive the leads directly into their CRM. Also, everything must be done automatically without any human intervention.
So, now this demands the integration of Java and Salesforce applications. Here, the Web Services Connector library and SOAP API from Salesforce will be used. The library will work as a wrapper layer to simplify the working of API in the Java application.
Also Read: 5 Tools to Help With Salesforce
Initial Setup
For the initial setup of an environment, developers have to take numerous steps. The Salesforce tipsheet suggests some of the major steps for the step.
Install JDK
Installing the Java Developer Kit will allow you to use Salesforce APIs in a Java application. You need to visit this page to install JDK and find a suitable binary for your local device.
Install Eclipse
Now, you have to pick a Java IDE. We opt for Eclipse. You have to download and install the Eclipse IDE on your device. You can find it here.
Install the WSC
We also need to install the WSC because we are using the SOAP API from Salesforce.
Download WSC pre-built .jar files
You will be able to see the list of all versions of WSC when you visit the Maven Repository. Select the version that matches the version of your API. 56.0.0 is the version we use here.
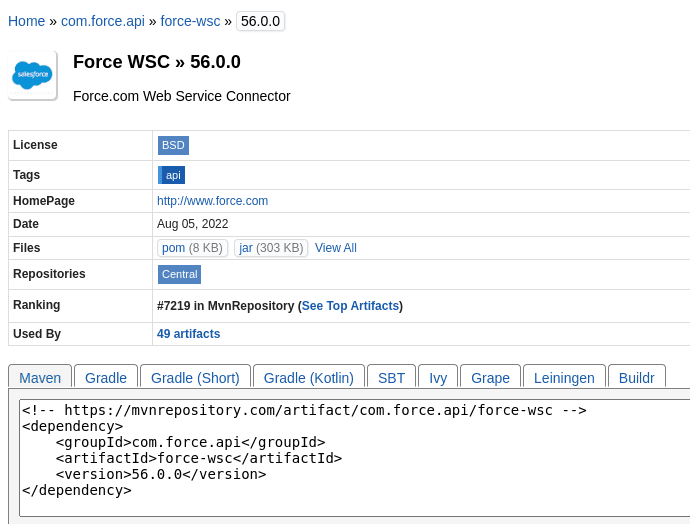
Click on the View All, option given under the files menu. You can then see the .jar files that you need to download on your local device.
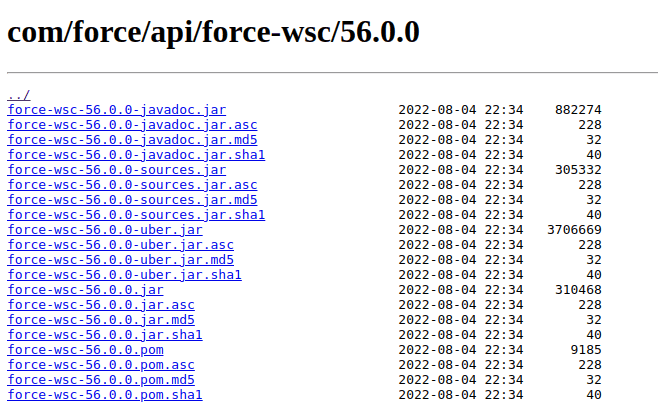
From that list, you have to download the four files mentioned below:
- force-wsc-56.0.0-javadoc.jar
- force-wsc-56.0.0-sources.jar
- force-wsc-56.0.0-uber.jar
- Force-wsc-56.0.0.jar
These files will be used to create stub files with WSDLs from Salesforce.org.
Also Read: How to Choose the Best CRM Software for Your Organization?
Generate WSDL
To create .jar stub files, first, we would need to build a WSDL. And because WSDL is specific to Salesforce.org, pre-built .jar files are of no use here. If you have defined any field or custom objects in Org then they will be reflected by WSDL. The .jar that you created earlier will contain all these fields and objects.
Now, log into the Salesforce developer organization and go to Setup> Platform tools> Integration> API.
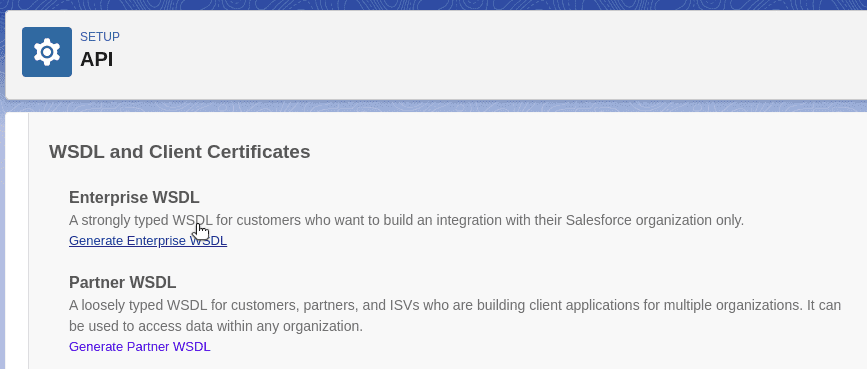
When you click “Generate Enterprise WSDL,” a new tab displaying the WSDL file will open up in your browser. Name the file as sfdc.wsdl and store it on your local device at the same place where you downloaded WSC .jar files.
Generate Java stub file
To be able to use Java with SOAP API, we first have to create .jar stub files in our project. To build them, we have to run the following commands:
`
$ java -classpath force-wsc-56.0.0-uber.jar com.sforce.ws.tools.wsdlc sfdc.wsdl sfdc_stub.jar
[WSC][wsdlc.main:72]Generating Java files from schema …
[WSC][wsdlc.main:72]Generating 1206 java files.
[WSC][wsdlc.main:72]Compiled 1210 java files.
[WSC][wsdlc.main:72]Generating jar file … sfdc_stub.jar
[WSC][wsdlc.main:72]Generated jar file sfdc_stub.jar
`
Create Java Project in Eclipse
Now in the Eclipse IDE, you have to create a new Java project, Java class, and Main with the help of the code given below:
`
package wsc;
// Depending on wsdl chosen, change this to enterprise or partner
import com.sforce.soap.enterprise.;
import com.sforce.soap.enterprise.sobject.;
import com.sforce.ws.*;
public class Main {
public static void main(String[] args) {
ConnectorConfig credentials = new ConnectorConfig();
credentials.setPassword(“YourPassword!apPenDdedSecurityToken);
credentials.setUsername(“yoursalesforceusername@yourdomain.com”);
EnterpriseConnection connection;
try {
connection = Connector.newConnection(credentials);
Lead le = new Lead();
le.setLastName(“AcmeEnterprises”);
le.setCompany(“JavaPush”);
le.setIndustry(“Hospitality”);
connection.create(new Lead[]{ le });
} catch (ConnectionException e) {
e.printStackTrace();
}
}
}
`
Also Read: 7 Most Common Use of JavaScript in Web Design
Add .jar files to project
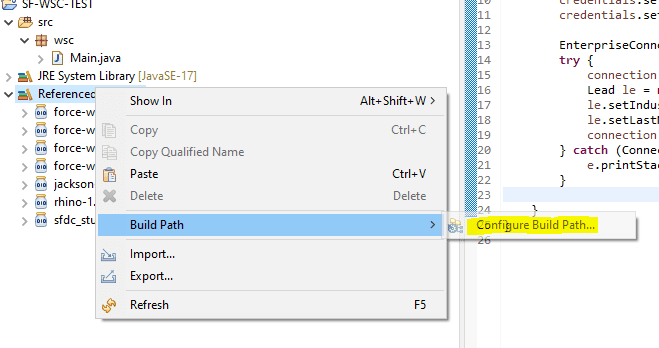
The four .jar files we generated before, should be now connected to the build path of the project. For that, do a right-click on your project. From the options, go to Build Path. There you will find the option of Configure Build Path.
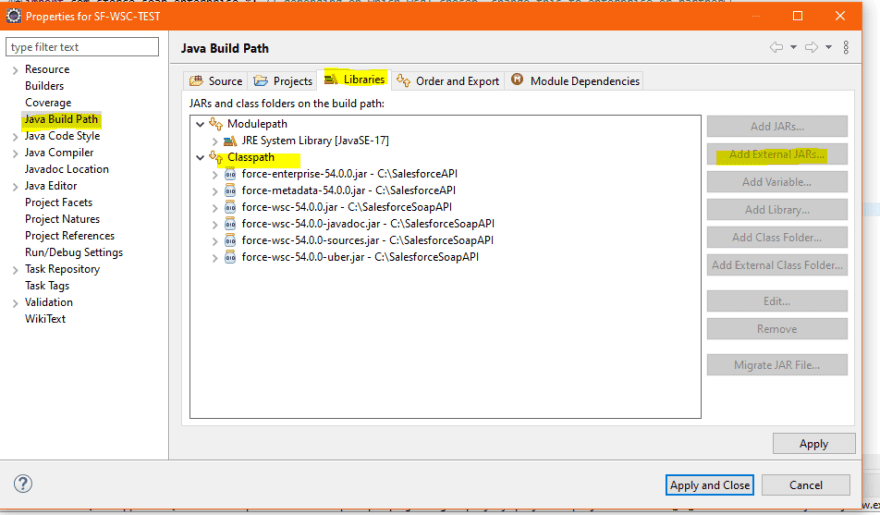
When the modal for Java Build Path opens, go to the tabs and click on Libraries. After that, you have to select the Modulepath and then click on the button called Add External JARs. The next step is to add all the .jar files and stub files from before. Hit the Apply button and Close.
Testing the App
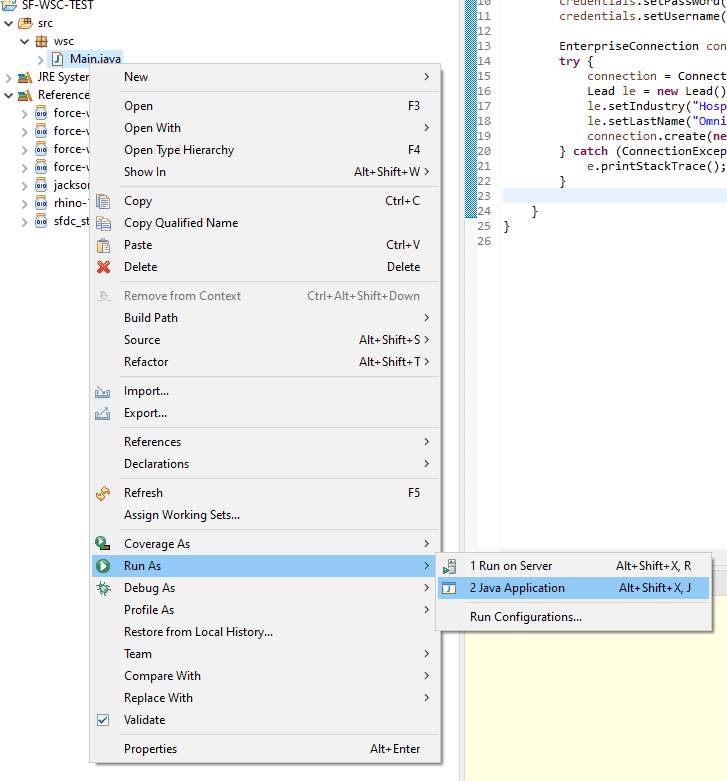
Now that all our .jar files and the code are in place, we are all set. In the Eclipse, go to your Main.java file and right-click on it. Select Run As -> Java Application.
After running the navigation, when you head over to salesforce.org and open the sales leads section, you can see that all your new leads have now started pouring in from your Java app.
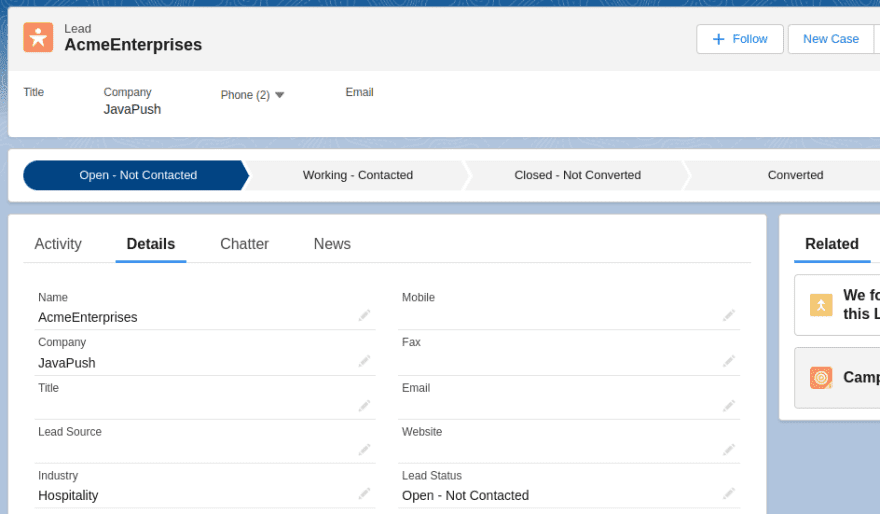
This proves that our Java app is successfully integrated with salesforce.org with the help of SOAP API using WSC.
Also Read: Top 8 Manual Testing Tools
What‘s Next?
This was just an example, a kind of a pilot task. After you finish this one, you can expand your Java app to perform various functions like reading, deleting, updating, and so on. Moreover, you can include your custom business logic to design a Java app that can manage the data from salesforce.org for you.
I hope this guide to integrating Java applications with Salesforce has been helpful to you.
We, at New Techno Times aim to provide the best technology information to readers to gain knowledge of what is going on in the world around us. For related blogs about cybersecurity and technology, Digital Marketing, Business, Education keep following us.